One of the most widely known telecommunication apps in the world, Skype enables people from all around the world to communicate with each other. It was founded in 2003 and was acquired by Microsoft in 2011. At one point in time, Skype was the most popular communication app but the rise of other apps has taken its place and become more successful than Skype. Nevertheless, Skype is still a juggernaut in its own right. It’s available for all devices so people can communicate through it no matter what they’re using or where they are in the world.
Skype has a lot of features to help users around the world communicate with each other. Two of its most notable features are Skype Translate, where conversations are automatically translated to the user's preferred language, and Live Subtitles, where there is a real-time transcript appearing on a screen when people are conferencing. To protect your privacy, Skype has also added end-to-end encryption so uninvited people can’t intercept your call. There’s still a way to further protect your privacy though and that is through installing a proxy server.
A proxy server can help hide your IP address thus also masking your real location, similar to what a VPN does. This is also useful when you’re in a country that has banned Skype because a proxy server can enable you to use Skype within that country. The best proxies to use for Skype would then be residential proxies as they are the most secure of proxies. If you just want to optimize Skype and make it run faster, then you can use datacenter proxies.
Note:It’s not recommended to use a free skype proxy. They’re usually unreliable and your sensitive information may be at risk of being intercepted.
To change your Skype proxy settings you have to configure a proxy server for your own system. Skype only copies your system’s proxy settings and utilizes it for Skype’s own use. The older version of Skype did allow you to set up an individual proxy server for Skype but it’s been removed in the newer versions.
Let’s configure your Skype proxy settings.
For Windows:
To set up proxies in Windows, simply search for “Proxy Settings” in your windows search bar and open the search result.
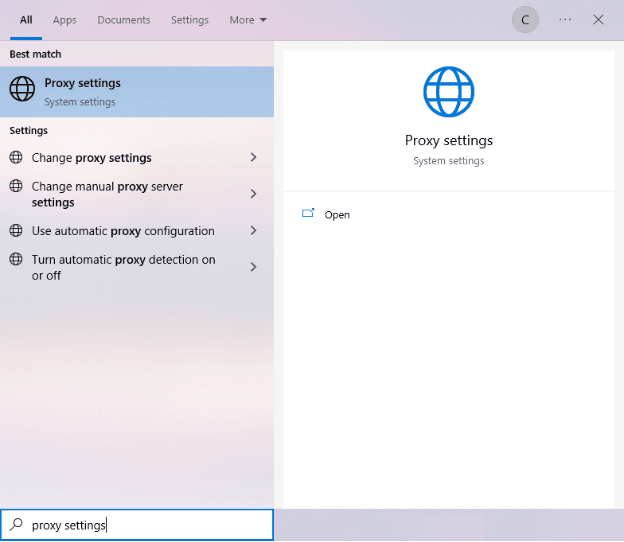
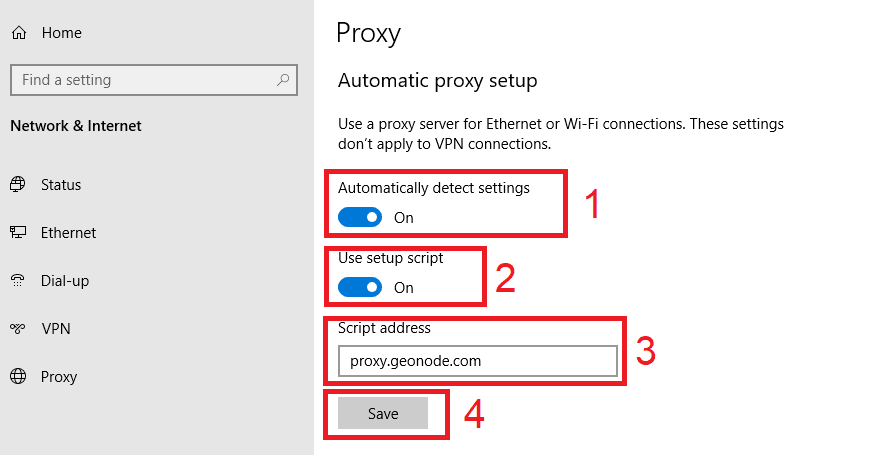
You are then given two options to choose from: Automatic proxy setup or Manual proxy setup. If you want windows to automatically detect your proxy settings, choose the first option. Choose the second option if you want to utilize a specific ip address and port number.
If you chose the first option, then:
- Turn on Automatically detect Settings
- Turn on Use setup script
- Enter the script address
- Click Save
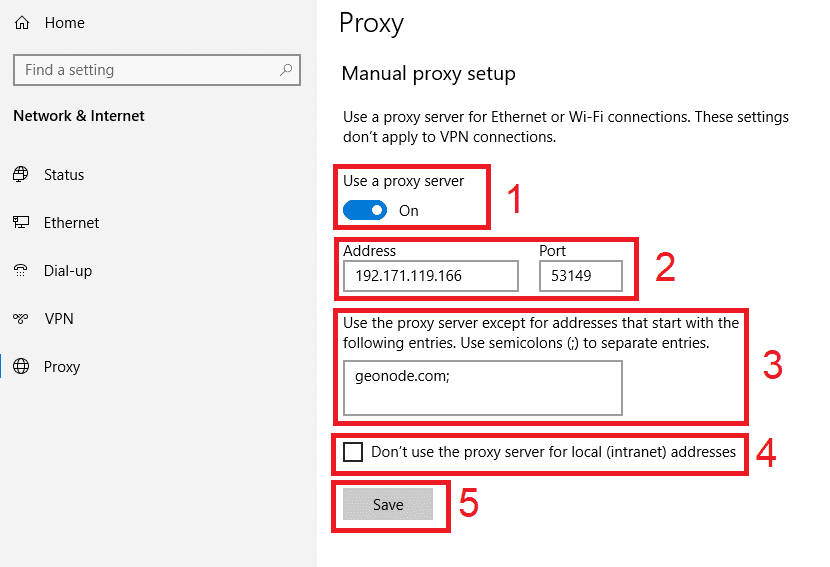
If you chose the second option, then:
- Turn on Use a proxy server
- Input both server address and port number
- If you have any addresses you would like to visit without a proxy, enter them here
- Turn on Don’t use the proxy server for local addresses check box if you want to access a local server without a proxy
- Click Save
For Mac.
To start configuring your proxy settings in MacOS, simply:
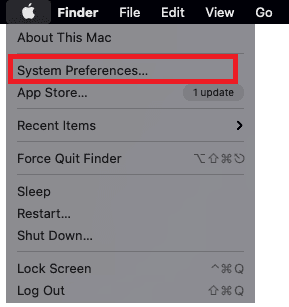
Step 1. Click on the Apple Icon.

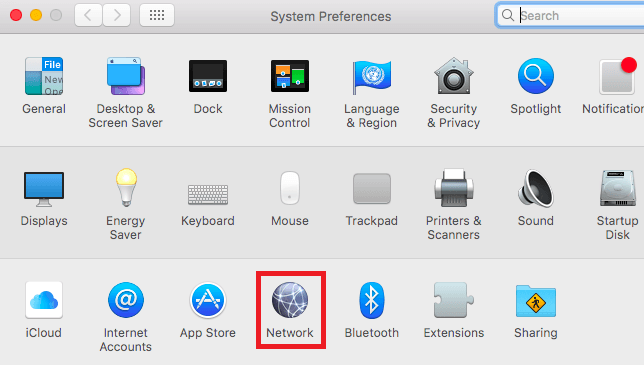
Step 2. On the drop down menu, click on “System Preferences”.
Step 3. Click on “Network”
Step 4. Click on “Advanced”
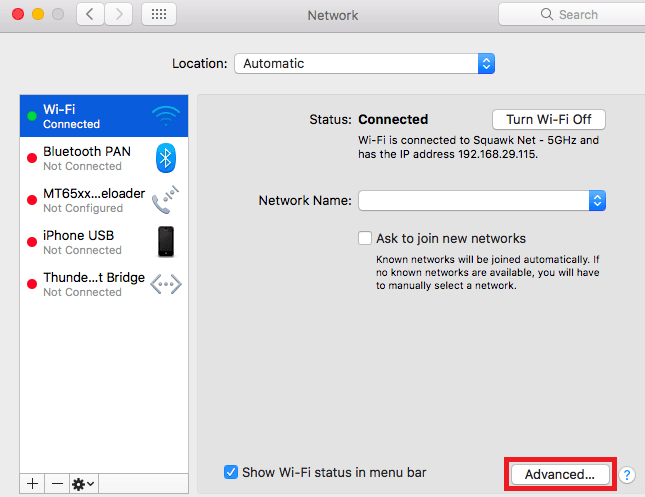
Note: Make sure to connect to your wi-fi first.
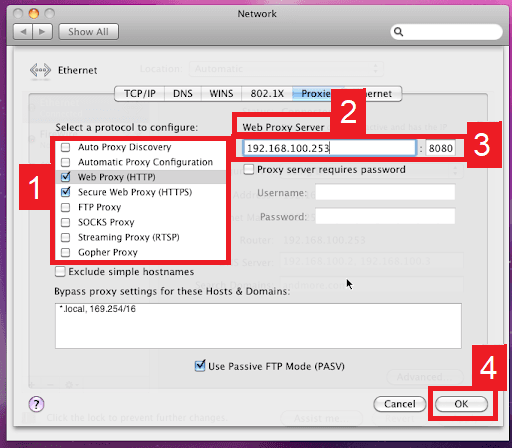
Step 5. Click on “Proxies”

This should then redirect you to MacOS proxy settings. MacOS is more straightforward compared to windows. You only have one option which is to manually configure your proxy server.
Here are the steps to follow:
- Select which proxy IP protocol you want to configure. This depends on which protocols your proxy service provider offers.
- Turn on Secure Web Proxy
- Input the Proxy Server Address and Port Number
- Click OK to save the configurations
Note: You may be prompted for your Mac user password to save your settings.
Congratulations! You have now set up a proxy server for Skype. If you’re using a web browser, remember to double-check if it’s set to copy your system’s proxy settings.
For Mobile:
To configure Skype proxy settings in mobile, simply configure your phone’s proxy server settings. The Skype app would automatically use it’s settings. This is applicable for both Android and IOS. Here’s a thorough guide on how to configure a proxy server for Android Skype and how to configure proxy server for Skype on iPhone.
Congratulations! You have now finished setting up a proxy server for Skype! A reminder that if you’re using a web browser for it, make sure that the browser you’re using is set to automatically copy your system settings. Google Chrome automatically does this, so it’s recommended that you use it.


